|
Part III: March through October 2006
Building a Passive Solar Slipform Stone House
An Ongoing Journal of the Adventure with Builder and Author Thomas J. Elpel
Photos by Thomas J. Elpel
Be sure to read Part I: April, May, and June 2005
and Part II: September, October, and November 2005.
 Back to work! We grouted the terra tile floor in the basement. |
 We built the front door frame out of rough cut lumber from the dump. |
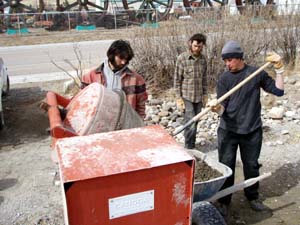 We started mixing concrete whenever the weather was warm enough. |
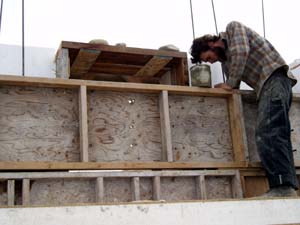 Working up the front of the building. |
 We reach the eight-foot level (measured from the main floor) in the front. |
 Working up the south side. |
 We did the top two feet of stonework from inside the house. |
 We put a half-circle window in above the door to the stairway. |
 We used free secondhand cinderblocks for the wall behind the fireplace, where the stonework will be on the inside, instead of the outside. |
 When we ran out of cinderblocks we finished the job with old insulating concrete forms I found blowing around in the woods a mile from the nearest road. |
 We installed small windows in the peak to let lots of light into the front of the building. |
 Our scaffolding is safer than it looks! |
 We finished the peak in the front. |
 This is what it looks like from inside. |
 Then we started working on the peak in the back. |
 We took a break for almost a month after doing the stonework. |
 We put up logs to support the floor for the reading loft... |
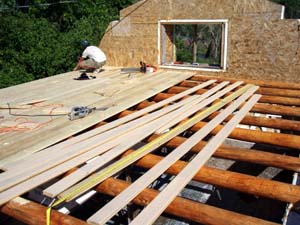 ...and then put the tongue & groove floorboards on. |
 We put the log beams and support logs up for the roof... |
 ...leaving the logs extra long off the front and back. |
 I trimmed the overhanging logs to the correct length, while Kris guided their fall with a rope. |
 We were able to cover the span between the logs with 4' x 8' sheets of 3/4" tongue-and-groove oriented strandboard (OSB)... |
 ...then placed scrap insulation panels on top and drove screws through from beneath to make it rigid. |
 We built a rim of rough-cut scrap lumber around the outside of the roof. |
 Two layers of the scrap 6 1/2" panels gave us a whopping 13" of beadboard insulation, with the second layer also bridging the gaps between panels of the first layer. |
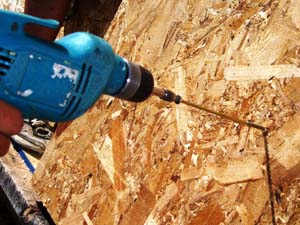 Eight-inch long screws secured the second layer of panels to the first. |
 We kept the access hole above the loft as long as we could to ferry materials up onto the roof, but it sure was a thrill to finally close it in! |
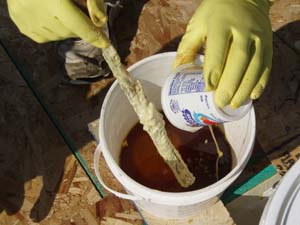 Rather than precisely measuring all of our cuts, we ordered some two part pourable polyurethane foam to fill the gaps. |
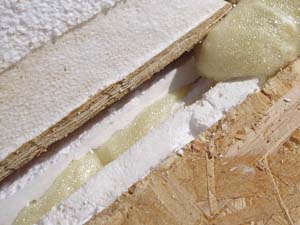 To conserve the pour foam we first stuffed the gaps with scraps of beadboard, then poured the urethane down in and let it bubble back up around the scraps. |
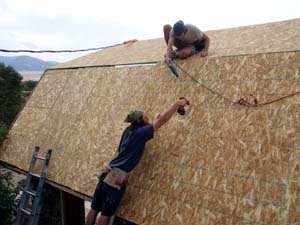 We added a top layer of 7/16"OSB to help bind all the pieces together and to sandwhich the rim boards, so they were attached at both the top and bottom. |
 After tacking on a layer of roofing felt, we started attaching the secondhand steel roofing. |
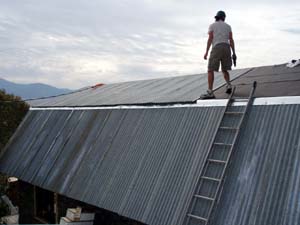 Flashing overlaps the lower layer of roofing, and the upper layer extends past the joint by about two inches. |
 I made a skylight with some gas vent piping and a Pyrex salad bowl, both from the thrift store. |
 We saved the thinner, rusty steel roofing to wrap the rim boards on the front and back of the house. |
 An extra piece of steel roofing was screwed down along the top to make a ridge cap. |
 We installed the windows and started sealing it up. |
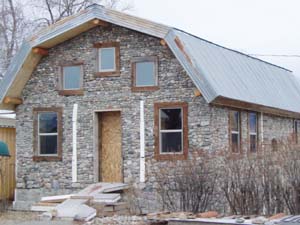 The closer we come to completing the house, the more it looks like it has always been here. |
Kris, Phil, and Merian showed up at the beginning of March. This year we would not be setting up the tipi at all, so they would be the first interns to truly make their home in the new house. Before they arrived I installed plastic windows, a temporary door, and a woodstove in the basement to start heating it up.
The one thing we had to do before they could move in was to grout and seal the terratile floor. Based on past experience, I knew we wanted to seal the tiles before grouting them, so that we could pretty much rub the grout in and then mop it back off, without having to spend a huge amount of time cleaning each tile. I also knew that we wanted a super durable surface, so that we wouldn't have to do any regular maintenance of the finished floor. I chose to go with a clear epoxy, which although expensive and nicely toxic to work with, would seem to be the better choice in the long run. It was a two-part epoxy with one gallon of Part A and one gallon of Part B. I mixed it all together, let it set the required sweat time, then painted it on with a paint roller. I had enough epoxy to cover about three-fourths of the floor. The fumes were still present in the basement when the guys arrived, so they camped out in a tent in the yard.
To grout the tiles, we used a mix of mostly silica sand, cement, and lime, but we also added some leftover tile grout purchased at the secondhand store, and we substituted latex paint for much of the water to make a smoother grout that would be more resistant to stains. I've grouted several terratile floors before, and I recalled that the process of cleaning the grout off of each tile had been incredibly tedious, so I hoped the epoxy coating on the tiles would make a difference. It did.
For the most part, we were able to rub the grouting mortar into the grooves between the tiles, then mop the floor clean. As long as we changed the mop water frequently, then the process seemed to go amazingly quickly. It was only when we got ahead of ourselves, when we grouted too far ahead of the mop and the grout started to set up on the tiles too long, that the real work began. We had to scrub and mop and scrub and mop until we could get the tiles clean again. After that, we were more careful about working smaller areas. Still, we were moving quickly enough that it seemed like we could almost grout the entire 800 square foot basement in only a day.
But then there was the fire. A neighbor had a permit to burn a pile of brush, and the morning was nice and calm. But a big wind came up shortly after he lit the pile and quickly blew the fire off of his property, and pushed it north along the river towards town. We watched it come, and assembled some fire fighting tools in case it jumped the dirt road into town. We were trying to keep an eye on the fire, while also making sure we didn't let the grout dry on the tiles. Just when it seemed imminent that the fire was going to jump the road, the fire department arrived and took control. We mixed more mortar and resumed grouting the floor. The fire stopped before it reached the road.
But it did jump over the river and quickly raced through the willows and grass. Then it jumped the road on that side of the river, and the wind fanned it into a big blaze in the brush straight across from us. At one point a cinder ignited the bark of a dead tree on our side, and the guys, along with my daughter Felicia, tore the bark off and doused the growing ember. We patrolled for additional hot spots, but the wind settled down and with it the fear of a big fire on our side of the river. Firefighters worked through the night mopping up the blaze, and by morning there were only a few small flames left and lots of smoldering trees.
The next day we finished grouting the floor. Grouting the epoxied part was easy, but we soon reached the remaining one-fourth section of the floor that had no epoxy. It took us the rest of the day to grout that section, a grueling process of scrubbing each tile with a sponge.
A couple days later the guys were able to move out of the tent and into the basement. We brought in a table, shelves, hot plate, microwave, plus a television and VCR. The only problem was that we had never been able to adequately seal the floor over the basement, so their living quarters were only waterproof when it wasn't raining. That isn't a great situation when heading into springtime, so getting the walls up and a roof on was definitely a priority.
Well, kind of. Actually, we made packframes and then went on a walkabout in eastern Montana. It was still too cold to do much serious construction work outside anyway.
After the camping trip, we started working on the building as much as the weather would allow. We built a door frame for the front out of rough cut lumber we found at the dump, and framed the windows and the rest of the wall out of more of the scrap panels from the junk pile at the factory.
 When the weather was still cold we heated water in a barrel with a fire for mixing concrete. |
Since the weather was still cold, and the sand, gravel, and rocks were all cold, we compensated by heating up the water to mix concrete. We propped a 55 gallon steel drum up on some rocks and stoked a fire under it to heat the water. After completing each days stonework, we insulated it with rags, carpets, and scraps of plastic. The weather wasn't bad for this time of year. But the nights were cold and it took awhile to warm up in the mornings. We worked on other projects along the way, such as tanning hides. Phil started reading house-building books out of the store, and read every moment that he could.
The floor over the basement could stand a light rain without it coming inside, but after a certain point, the basement seemed more like a rainwater catchment system than a house, and we had some big rainstorms. The guys hung up tarps inside the house, basically making tarp tents inside the living space. They were able to keep the electric appliances dry, and they made two dry sleeping spaces. But the more rain that poured into the basement, the more it just flowed across the tile floor into the dry spaces, in spite of dams made with piles of rags to hold it back. Kris slept under a tarp by the table, while Merian slept in a hammock under another tarp. Phil moved into the garage whenever it rained. I appreciate the spirit and tolerance of the guys to put up with it all!
I watched the weather forecasts every day, and when it got too bad out there, we abandoned the basement and came over to our house in Pony while we waited for the weather to clear up. Then we had to mop the water back out of the basement and dry everything out again. When the weather permitted, we resumed work on the house and gradually brought the stonework up the walls. I made a half circle of scrap beadboard insulation and used it as a form in the wall for an arched window over the stairway. By the first week of April we finished the stonework up to the eight foot level (as measured from the top of the main floor) all the way around.
There was just one section of wall that was different from all the rest. Although the house is intended to be warm enough not to need either fossil fuels or firewood, there is a great appeal to being able to have a fire when you want one. I've also been wanting to test out a next-generation design of the masonry fireplace we built in our home, and this seemed like the perfect opportunity for it. For the wall behind the fireplace, we placed the insulation panels on the outside of the house (which will eventually be in the garage), and we built up a wall of cinderblocks. Some of the cinderblocks were given to us. Others were on the site already, originally used underneath the trailerhouse, plus we picked up a few at the dump. When we finally ran out of cinderblocks, we finished the project with insulating concrete forms, which I had found blowing around in the woods a mile from the nearest road. The section of wall immediately behind the fireplace was left open. Ultimately, the fireplace will be designed so that it can be loaded from inside the garage, without ever hauling a mess of wood chips inside the house.
Merian left in early April, shortly after we reached the eight-foot level all the way around. He hitched a ride back to Vermont, where he and his dad hope to build a house over the summer. After a short break, Kris and Phil and I resumed work on the project. We drew out a template for the barn-style peak on the main floor, then set the scrap panels in place and cut them to fit the pattern. Renee helped to decide the size and position of the windows. We added three small windows to the west side where there will be a high ceiling inside the house. The windows will really let the light in on that side, although I am concerned about the possibility of getting too much heat in there in the summer. But we can always add shades if necessary.
Our scaffolding became more and more interesting as we went along. The metal scaffolding only went up about four feet. Everything above that was built with planks and scrap panels. We moved our scaffolding inside the house and reached over the insulation panels to do our stonework. That put us up quite a bit higher relative to the wall, without being so high off the ground. We brought the rocks and concrete inside with a wheelbarrow. Although our scaffolding looks scary in the pictures, it was all put together according to sound principles, and it easily held all of us, our piles of rocks, and the buckets of concrete. We finished the front peak first, then assembled insulation panels for the peak in the back and moved our scaffolding to that end of the house.
Work often proceeded slowly due to a combination of cold mornings, intermittent rain and snow, and I often watched the store while Renee took Edwin to preschool, plus we often did other activities with the kids in the afternoons and on the weekends. Phil and Kris joined us at home in Pony for four days over Easter weekend. I taught a basketry class at the end of April, and we finished the stonework to the top shortly after that. After doing so much stonework, it was really exciting to reach the peak. I felt like a great weight had been lifted - one rock and bucket of concrete at a time!
Phil left right after we finished the stonework up to the peak. He headed out to Oregon to join a few other people doing organic gardening and other alternative living projects. Thanks Phil for all your great help!
Kris and I were all ready to start the upper loft and roof, except that the logs I ordered weeks ago for the project hadn't shown up. That's okay. Kris and I were distracted with some other projects. We brought the Harrison School seventy and eighth grade classes out for some wilderness survival camping trips. I worked on some writing projects for awhile. We went on lots of hikes with the kids. I helped run the store for a few days while Renee was busy elsewhere. But finally, the logs did arrive near the end of the month, and we went back to work.... at least for a little while.
The poles were all pre-peeled and reasonably straight. We put up some support logs and central beam, then put the log joists across for the reading loft. Since the logs taper from end to end, we had to notch them to fit the walls at either end as well as to fit the central beam. It took about a day to get the logs up. Then we stained them with secondhand stains from the Habitat for Humanity Restore, a thrift store where I like to do most of my shopping for building materials. I mixed up a batch of stain from several different shades to come up with enough to do all the logs... or so I thought. Actually, the logs soaked up the stain like a sponge, so I had to mix a new batch to stain the rest of the logs. My second batch came out pretty similar to the first, so you really cannot tell that the floor logs were stained with two different batches.
Then we bought some 2 x 6 tongue and groove floor boards to span the logs, just as we did for the downstairs. Only this time, we went ahead and stained the good side of the wood before putting them up. I used more secondhand stains and mixed up a dull, but transparent whitewash, which we brushed onto the good side of the wood before flipping it upside-down to make the ceiling. The top merely serves as a subfloor for something else we can add later. Kris and I secured each 2 x 6 down with one nail on each joist to move more quickly through the project. Then I asked my daughters to come put in the rest of the nails. Cassie decided to start all of the nails first, before pounding them in. She had about 600 of them sticking up all over the floor, before she and Felicia drove them all in.
Next we were ready to put up the log beams to support the roof. Unfortunately, I was out of stain again, and this time when I mixed up a new batch from secondhand stains, it came out a bit oranger than the stain we used on the floor logs. We stained all the logs we could until we ran out of that, and I mixed up yet another batch which came out more on the red side. That is definitely one of the challenges of working with secondhand stains! I couldn't believe how much stain soaked into the logs. We ran out of the reddish stain, and still had logs left to do. Well, no hurry. We decided to put up the log beams as they were, with some orangish, some reddish, and some unstained. We used the lighter orangish logs in the front part of the building where they would be most visible and the redder logs in the loft in the back, where they wouldn't show up as much, with unstained logs mixed in as needed. I will probably end up with yet another color by the time I get a stain on them.
 We drilled holes and nailed the logs together with rebar pins. |
My brother and sister came over for a day to help framing the roof. The logs were pretty heavy, but two or three of us could pick them up and move them by hand, without the need for any special equipment. We propped the logs up on blocks and used a string to level them from end to end. Then we cut the support logs and put them in place underneath. We drilled holes through the logs and nailed them together with short rebar pins. By the end of the day we had the central log beam in place, as well as the two purlins that give the roof its barn shape, and most of the cap logs that sit on top of the walls. The cap logs took the most time, since we had to measure and cut notches into them where they met up against the floor logs, plus we had to drill holes through for the rebar that came up out of the stone walls. We lowered the cap logs onto the rebar, then cut the rebar off about two inches above the logs and bent the stubs over with a sledge hammer to anchor the logs in place.
I would love to have completely put the roof on it, but hey, it was now June, and there were simply too many other distractions. I couldn't get excited about working on the house, even if we did have the time. We decided we could take a break and watch for some secondhand lumber to get started on the roof. But the rains kept coming, and the basement kept getting soaked, and a few of the logs under the basement floor started sprouting fungi. Every time I looked at it the project, it just seemed clear: we absolutely have to get a roof on it! We went on hikes almost every day with the kids, went camping for awhile, and spent some time at our own home in Pony. Kris tanned some more hides and started sewing his own buckskin outfit.
Finally, we felt sufficiently caught up on other things that we decided to spend at least a few days working on the roof. Since we hadn't yet found a source of secondhand lumber, I bought some 4' x 8' sheets of 3/4" tongue-and-groove oriented strand board (OSB), which is normally used as a subfloor, but seemed like it would work well for our project. The sheets were just slightly longer than our span between the logs. We nailed them on with a gazillion nails of every shape and size, since the entire roof would be attached to these sheets of OSB, and the OSB was only attached to the house where it touched the logs.
It has been my desire for some time to build a roof without any rafters or trusses, partially due to the expense of the lumber, but also due to the inherent inefficiencies of insulating between the framing and having heat loss either through the wood or beside the wood where there might be gaps in the insulation. I wanted an effectively frameless roof with nothing to cut through the insulation.
It would be easy to build such a roof by ordering the R-Control insulation panels with beadboard insulation in the core and OSB on both sides. The panels are structural enough to serve as the framing, insulation, and ceiling all in one unit. However, we were working with scrap insulation panels from the factory, only some of which were long enough to cover the span between the logs. Thus we used the 4' x 8' sheets to cover the span, and although a bit bowed in the middle, we were able to add our insulation panels on top of that, and drill screws in from beneath to suck the OSB up against the scrap panels to make it all rigid. We mixed in the 8-foot long scraps with the shorter scraps to make sure we had pieces spanning from log to log throughout the roof.
We used six-inch thick insulation panels, since those are the most commonly available on the scrap pile, but that meant we would have to come back and do a second layer on top of that. We left a section of the roof open over the loft, so it would be easy to get ourselves and our building materials up on the roof. But otherwise, the entire building had a semi-functional roof over it to keep the inside dry. Then the rains finally stopped for the summer, and it wasn't so much of an issue anyway. In any case, it was sure a thrill to see the house taking shape.
At this point, we only had insulation on the upper section, which needed it the most to keep the supporting OSB from bowing. The span was slightly shorter on the lower sections of the roof and the OSB was more vertical anyway, so there was less bowing of the wood. Before we could insulate the lower sections, we really needed to build a wooden rim to keep the panels from sliding off while we screwed them in place. We built the rim out of some old rough cut lumber, most of which we had found at the dump over the last year. We only had enough on hand to form a rim for the north one-third of the roof, but that was enough to keep the project rolling for awhile. I picked up some secondhand glue at the Habitat for Humanity Restore and we started gluing the scrap insulation onto the roof, in addition to the scores and scores of screws that we used from underneath, to hold all the pieces together.
We only worked on the roof about one day a week through July, and most days we were out there I ended up giving tours to people passing by. The funny thing is that more and more people started asking us if we are "fixing the old place up". They thought it was a historic building and we were restoring it, without realizing that we just started building it last year!
In August we were joined by Adam from Michigan who stopped by for a couple days to check out the project, and ended up staying for over a month. With Adam's help we were able to finish insulating the entire roof with two layers of the 6 1/2" beadboard panels. The one expense I didn't expect was the cost of the screws. The only way we could find to attach the top layer of insulation to the lower layer was to screw it down with costly 8" long screws, using $600 worth of screws just to add that second layer of insulation. Otherwise, the roof has largely been far less expensive than it could have been.
I did spend over $300 on some two-part polyurethane pour foam (5 gallons of part A and five gallons of part B) to fill the gaps between the panels. In the interest of saving time, we didn't cut all of our joins precisely, but often had substantial gaps between the insulation panels. With the two-part pour foam it was easy to mix up a batch, pour it into the gap and let it bubble up and fill the void. It helped to glue everything together and seal it up really well. But after the first couple batches we could see that the project could quickly require a lot more pour foam than I bought. We experimented with various methods to conserve materials and found that if we stuffed bits and pieces of scrap beadboard insulation into the gaps, then we could pour a little bit of urethane foam on it, which would seep down into the spaces, then bubble back up to fill all the voids. According to the directions, we had 25 seconds to mix it and 45 seconds to use it before it reacted and bubbled up to make foam insulation. We used a stop watch at first, but with practice we felt comfortable just counting down as we stirred, and simply poured quickly after that, though the short working time required that we make a lot of smaller batches.
Kris went home to Colorado for a week to see his family, and we took the kids camping, while Adam stayed at our house in Pony and worked on some projects there. He brought along a complete set of buckskins when he came, and Kris made his own complete set of buckskins here over the summer, so after Kris returned and our kids started school, the three of us went on a couple of camping trips. Unfortunately, the dry summer weather brought about numerous forest fires, weeks of smokey haze, and fire restrictions just about everywhere. We camped primitively on private land for a few days where we could have a fire, then did a not-so-primitive trip up in the mountains, cooking on alcohol stoves, which were still allowed under the fire ban.
 We secured the top and bottoms on the top layer of OSB, then used a rope and harness with Kris as he put all the middle screws and nails in. |
Back on the project for a few days, we added a top layer of 7/16" OSB over the entire roof to help tie all the scrap panels together into one unit, and especially to sandwich the rim board in place, such that it was attached both at the top and the bottom all the way around the house. The work was easy on the north side of the house where we could stand on the garage roof, but much more challenging on the south side high above the ground. However, by using the garage roof as a halfway point, we could hand up the building materials to the top, then pass them down the steep south side to secure them in place. We secured the OSB along the bottom from a ladder and along the top by reaching over the edge. Then we hooked up a rope and harness, which we used to hold Kris as he worked over the middle section, driving in the rest of the nails and screws.
The next thing we needed to figure out was where to come up with some steel roofing. I originally planned on buying new colored steel roofing, but as the project progressed I became increasingly budget- and eco-conscious, wanting to use secondhand materials. I also enjoyed the increasingly antiquated appearance of the building, and the fact that even people who had lived here all their lives were starting to ask about the history of the "old place," so it seemed like some secondhand, slightly rusty tin roofing would be a nice touch. I started asking everyone I talked to if they knew where I could find some, and finally scored when I was hauling in our paper and plastic to the recycling center. They happened to have a neatly stacked pile of steel roofing, which they would sell for twenty-five cents a pound. I checked it out, and it was perfect, aside from the sheets being quite long. Now I just had to figure out how to get them home.
My neighbor loaned us his sixteen foot flatbed trailer, which motivated me to stick a new radiator in my old Jeep pickup, plus I had the brakes fixed, and installed the right size ball to tow the trailer. The roofing sheets were twenty-five feet long, which my neighbor suggested was too long to carry on the trailer without fishtailing down the highway, so Adam and I brought along a saw and a metal cutting blade to cut them to the desired lengths at the recycling center. But for liability reasons, the recycling center would not let us plug into an outlet and make the cuts. We went ahead and loaded the trailer with the full length panels, which were at this point dragging on the ground, then pulled over to the scale in front of the office, figuring that they would either let us cut them then, or we could figure out some other solution. They used a fork lift to raise the pile, then put some old pallets underneath to raise the steel up off the ground. It seemed to work just fine, but we were still hanging way out there and heavily loaded. Although we didn't need any cement at the moment, we stopped by the lumber yard and bought ten sacks to put on the front of the trailer to help balance the load. It was still an awkward load to make the forty-five mile trip up over the mountains back to Silver Star, but it worked just fine at 35 miles an hour.
The steel was heavier than I estimated, costing $600 for enough roofing to cover the entire house, plus a little bit extra, which we will later use for the porch and greenhouse. Still, it was far less costly than buying new steel for the project, and I quickly realized that the reason my estimate was off was because it was really, really thick steel. It must have been used for the walls of a steel building, thick enough to stand some abuse without damage. It should last forever on the roof of the house.
But before putting the roof on, we took the kids out of school for a week and went off to Rabbitstick Rendezvous in Idaho. I teach classes there on botany and survival skills, and it is always a good family-oriented environment to bring the kids to. Kris and Adam also came to Rabbitstick, and Adam found a ride to get him back home in time for his brother's wedding. Thanks Adam for all your help. It was great having you here.
Kris's father Jim joined us for a few days after Rabbitstick and helped us to put the steel roofing on. I bought two abrasive metal cutting blades for the Skilsaw, but wore through them right away cutting through the thick steel, so I went back to the hardware store and bought ten more blades. I also bought some new roofing felt, along with some damaged rolls at a discount at the lumber yard. We cut away the damaged parts, then put down a layer of good felt, covering only as much of the roof as we could work on in one day, so the wind wouldn't rip the rest off the roof.
Once we got started, the sheets went up quickly, as we put in just a few screws to hold the panels in place. Only when we had an entire section covered did we come back and put the rest of the screws in. Unfortunately, my electric drill died and I was waiting for parts to come in the mail, and even with two cordless drills, we could only do small sections of the roof before we had to stop and recharge the batteries. It wasn't a major problem, since there are always a gazillion other things to do around here, but it did slow down the roofing process a bit. The other problem we ran into was that the metal was too thick to drive the roofing screws through by themselves. We used the existing holes as much as possible, but we had to drill in some additional holes along the tops and bottoms of the sheets, and at the seams where the steel roofing overlapped. We also tried some self-tapping screws that drilled their own holes, but it wasn't substantially faster than drilling with a bit and using regular roofing screws. Like I said, this roof is thick enough to last forever!
The tricky part of putting the steel on was to wrap the flashing over the top of the lower section of the roof. We nailed the flashing on the roof, then folded it down over the tops of the steel roofing and screwed it in place, but we pretty much had to lay on our bellies and hang out over the edge while we drilled the screws in. The upper roof isn't really steep enough to be dangerous while laying there, but it was nice to have Jim holding onto Kris's feet while he worked. Later we screwed a 2 x 4 down along the edge to give us something else to hold onto. Mostly it was just an awkward angle to run the drills, so it took awhile to get the flashing on.
On the upper section, above the reading loft, we cut through the roof and installed a 10" diameter skylight. The kits at the store cost $200 and didn't seem like they were made for this kind of roof, so I made my own for $20 from a piece of double walled gas vent pipe and a Pyrex glass salad bowl, both from the thrift store. That salad bowl looks pretty good on top of the house.
This project has made me question whether or not I would ever want to build another gambrel, or barn-style roof. I like the looks of it a lot, and it has been a low-cost method of working with mostly recycled materials. The gambrel roof also provides a lot of headroom in the loft, and a good angle for solar exposure on the steep south-facing slope, but it turned into a substantially labor-intensive project. The roof happens to be super-insulated, but the project seemed to last forever. Although we had a lot of distractions, other people have built entire houses while we were merely putting the roof on this place. True, they may be in debt for the next twenty or thirty years to pay for it, but I believe it should be possible to build a quality house both quickly and inexpensively.
Then again, maybe the roof didn't really take that long after all. I just notice the passage of time a lot more in the summer, when I could be out camping in the mountains instead!
In addition to the thick steel roofing from the recycling center, I also picked up a few sheets of some fairly thin, semi-rusty roofing, which we folded over the rim boards across the front and back of the house to protect them from the weather. For a ridge cap, we used the heavy steel and screwed it down along the top. These trim pieces can otherwise get to be pretty expensive when you buy them new, but the only "trim" I bought new was the flashing, which stands out in contrast to the weathered galvanized steel, yet doesn't look too bad. In fact, I am quite pleased with the roof, and it is a delight to finally have the place truly protected from the weather. And as incredulous as it seems, even some of the people who have been driving by watching us build the place seem confused about the history of it, as if it has always been here. You would have to be here to talk to people to believe it yourself!
The last project Kris and I tackled before he left in October was to install the windows and doors. For maximum energy efficiency, I ordered low-e vinyl windows, which are easy to install and never need to be painted. As far as the doors go, we bought them all secondhand at the Habitat for Humanity Restore. After just a few days of installing windows and doors, we had the building closed-in and semi-warm, though there are still plenty of other little holes to patch up. Kris headed home for the holidays, and expects to come back later to help out with wiring and plumbing. Thanks Kris for all your awesome help and friendship. We miss you!
I went into writing mode when Kris left. I sketched out a new book the previous winter - this one on the nature of reality - and now returned to the project to work full time on it for awhile. I continued to pick away at projects on the house whenever I wasn't writing, sometimes only long enough to put trim around one window at a time. My daughters helped me texture and paint the ceiling, using recycled materials from the Habitat for Humanity Restore. We used a primer on the bare wood of the ceiling, then troweled on a texture mixed from secondhand plaster, tile grout, latex paint, and silica sand. The textured ceiling was dark, so it took three coats of beige paint, and most of the winter, to fully cover it.
Renee did our end-of-the-year accounting and determined that I had spent $24,000 on the house so far. The house is about 2,000 square feet in size, so I am already over my hoped-for budget of $10 per square foot, and still have a ways to go. In actuality, inflation has doubled the cost of all the building materials since we built our original house for $10 per squre foot in the 1990's, so I guess we are doing pretty good. No matter what, it will be a low-budget house and much more energy efficient than any conventional structure.
Continue with Part IV: 2007
Check out Living Homes: Stone Masonry, Log, and Strawbale Construction.
|


 DirtCheapBuilder.com


