| Thomas J. Elpel's Web World Portal  DirtCheapBuilder.com |  


 DirtCheapBuilder.com
Build your own low-cost, earth-friendly, high-efficiency home! Home | Building Methods | Construction Articles | Building Schools | Tom's Books & Videos |
|
Salvaged House Construction Little did I realize that recycling and reuse were in the history of my house, nor that the two would continue to play main roles in its story over the next forty years as I expanded the original four-room cottage into a nine-room Cape with a separate gambrel barn. But they did. The original house, assembled around 1950, was a package of an old tractor barn and a chicken coop dragged out of a line of old sheds. This I would discover years later after the publication of a magazine story I wrote about taking off the roof and adding a second story would draw the attention of the original owners, who sent me some photographs.

The house we bought in 1973 included a living room, a kitchen, and two small bedrooms - suitable at the time for a couple expecting a first child and starting out a new teaching career. An expanding family and a modest teacher's salary would turn me into a do-it- yourselfer who found that he could save on building costs by salvaging materials from classified ads, salvage yards, and yard sales or by taking down buildings myself. These projects would be done during my summer breaks during the school year.
The first addition was an extension of the kitchen roof line to give the end of the house a saltbox look. Stairs down into this space would circle a little half bath and allow entry into the garage beneath the kitchen. Framing timbers, windows, even clapboards, would come from a greenhouse that was demolished in Lexington. A woodstove in the room would generate currents that rose up the stairway and circulated through the rest of the house as the primary source of heat for years to come. 
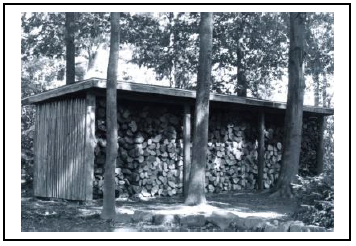
A number of years later, to facilitate the firewood operation, a three-bay wood shelter was constructed outside from a salvaged stockade fence that had belonged to a teaching colleague. The only cost was for roll roofing. The second main addition, to provide two upstairs bedrooms while negating the need for a further foundation, was to remove the ranch-house pitch of the original barn roof and add a second story, sneaking in a staircase through two back-to-back closets. As the ceiling of the first floor was suspended a foot down from the top of the original walls on a ribbon board, a new deck had to be constructed atop those walls to support the second story. This was done through the use of staging planks from an Ipswich painting contractor who was retiring from business. Clapboards for the exterior and replacement four-panel doors for the entire house came from an old Newburyport Federalist mansion that had been extensively damaged by fire.
This summer was spent in planning the process, pre-cutting and assembling the deck and wall pieces, and, when a clear weather pattern emerged, taking off the old roof and putting up the new second story over a three-day period with the help of friends and teaching colleagues - like an old-fashioned barn raising.
When an old three-bay tractor barn on the school property where I taught was scheduled for removal, I decided that I could do that while salvaging the materials for my own property, fifteen miles away. The shed roof was stripped of shingles, the eight-inch tongue-in-groove roof boards were removed one by one, and the barn walls were cut to size for the new slab in my yard. Again, friends and colleagues joined me to load a hired flatbed truck for the move up the highway and to lift the walls onto the slab. From there I worked the rest of the summer to frame in doors and windows, to erect ceiling joists, to re-cut the old rafters into gambrel style, to re- apply the tongue-in-groove boards, and to shingle and paint the structure. There is not a stick of new wood in the structure.
We still didn't have a separate dining room in the house, so the decision was made to blow out a picture window in the living room to form an archway into a new dining room over a full cellar. Structural timbers for this addition came from the top floor of the local Polish- American club that was removed in a renovation project to create condominiums. The sub- contractor hired to remove the debris agreed to deliver the timbers to my house instead of the dump for $100. I just had to pull all the old nails. The antique, rough-cut, brown beams are exposed as collar beams across the cathedral-ceilinged dining space.
While the cellar below the dining room was originally intended to be my woodworking shop, my older son eyed it as a new bedroom for himself. This I agreed to, provided he work with me to make it so. That summer we wired, insulated, sheet-rocked, and painted the room after cutting in an entry door from the first woodstove room addition. The "doghouse" entry door from the outside, originally intended for bringing in materials, would stay locked.
This set-up would suit our purposes for years, but upon retirement from teaching, I decided that a second-floor bathroom would be desirable for old age. To support this structure, I would build a farmer's porch off the back of the house in the ell between the dining room addition and the original back wall of the house. Entry to the bathroom would be through a second-floor window, and entry to the porch would be through a dining room window, both replaced by doorways. For this job, now in a better financial situation, I would use new LVL support timbers, 2x6" roof rafters, 2x4" studs, plywood sheathing, clapboards, and rubber roofing. Just for the experience of it, I used new galvanized hardware pieces to tie the structure together.
 See also: Living Homes: Stone Masonry, Log, and Strawbale Construction. Return to DirtCheapBuilder.com Home |
|
Looking for life-changing resources? Check out these books by Thomas J. Elpel:
|
|
|


