 The house was a literal shack when we started work. |
 Fiberglass insulation in the ceiling was sealed with a plastic vapor barrier. |
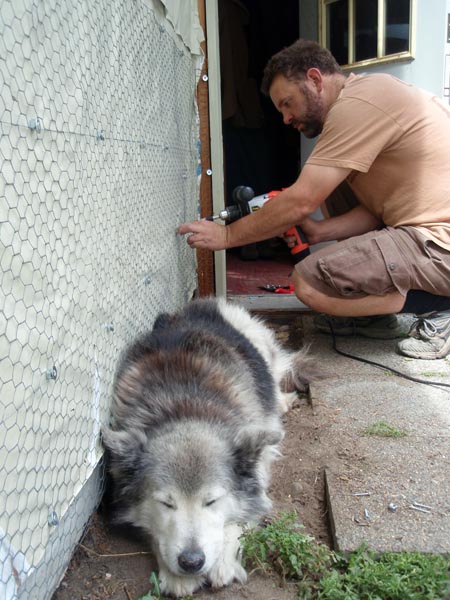
 We applied chicken wire to the outside. |
 We troweled stucco mortar over the chickenwire. |
 A vast improvement for very little time or expense. |
 Remnants of the original tarp roof can still be seen under the eaves. |
 We poured a footing and wrapped the lower wall with asphalt roofing and chickenwire to add stonework. |
 Stonework provided a quality finished look and good protection from the elements. |
 The back window was too small for a proper kitchen. |
 We cut out a section of wall for a bigger window. |
 The installed kitchen window. |
 We poured footings to tie the house to an adjacent slab. |
 We framed the bathroom walls out of recycled lumber. |
 We cut and peeled logs for timberframe work. |
 We timberframed the porch and ridgepole. |
 Support logs were bolted down to the slab. |
 Installing roof rafters. |
 Mousey fiberglass insulation was removed and replaced with foam. |
 We cut a doorway through the stucco wall to connect the house and bathroom. |
 Looking out. |
 The new door. |
 Recycled wood in the ceiling. |
 The bathroom was closed in with sheets of OSB. |
 We added tar paper and stucco wire. |
 Troweling mortar up behind the rafters. |
 We were helped by friends for the day. |
 Finished stucco work. |
 The bathroom window. |
 Formwork for pouring the kitchen counters. |

Little Stucco House
Remodeling a Shack into a Home
Story by Thomas J. Elpel, Author of Living Homes
I once helped a friend remodel a shack into a cozy little home. Any reasonable person would have demolished the house and built from scratch, yet there were good incentives for working with what was available. The building started as a tiny 8 x 12 tarp shed, a wood frame structure on a concrete slab covered by a blue tarp. Someone later added plywood and steel roofing, plus a slightly larger addition set on pier blocks.
The walls and roof were insulated with fiberglass batts and sealed off with clear plastic. The building had doors and windows, a woodstove, partial wiring, and an unused water supply pipe hidden under the floor. The walls were neither square nor plumb, sometimes off by inches. The house was riddled with mice that could be seen and heard overhead through the plastic barrier that covered the insulation.
 Attaching chicken wire to the wall for stucco work. |
The logical choice was to bulldoze the structure and build a new house. On the other hand, this was Katie's home, and there was nowhere else to live nor surplus money to build a new house. Instead of investing tens of thousands in a new structure, renovating the shack necessitated spending a few hundred dollars at a time to improve the shack over several years.
The plywood walls of the original tarp shed were covered by ugly plastic house wrap, so we tacked up old chicken wire and troweled on cement stucco to beautify the exterior. Then we poured a shallow foundation under the addition, bonding the pier blocks together to prevent mice and cold drafts from coming under the wooden floor.
We racked our brains to figure out how best to add a bathroom and eventually removed an adjacent tarp shed and connected that concrete slab with new footings to the existing house. We salvaged free lumber for most of the framing work and roughed in the plumbing and wiring. Eventually, the mouse-ridden fiberglass insulation was removed and replaced with sprayed-in foam. The plasterboard and fixtures soon followed.
Intermittent investments of time and money resulted in a surprisingly cozy little home. It wasn't a dream house, but well within the financial and experiential ability of the owner. The house later became a charming rental property.
 As noted in my book Green Prosperity: Quit Your Job, Live Your Dreams, sunk costs are theoretically irrelevant when making decisions, yet an asset can have sufficient value to sink more time and money into a project. Short-term economics often drive marginal decisions into long-term commitments. We make decisions on the margin every day, collapsing future variables into choices sunk in the past.
The Building Process
The project started without a particular long-term plan or goal. Half the shack was wrapped in glaring white house wrap, which was an eyesore for Katie and her neighbors. I donated some secondhand chicken wire and powdered concrete dye to the project. I'd found the dye in a dumpster years ago and had no use for it until getting involved with this project. We attached the chicken wire to the walls, bought a few bags of cement and a half yard of sand then dedicated a day to mixing stucco mortar and troweling it on the walls. Bing, bang, boom. For less than $100 in materials, the house was vastly improved.
Or was it a still a shack? Looking up under the roof rafters, there were still visible remnants of the tarp that constituted the roof before the previous owner installed rafters and steel roofing.
House remodels are slippery slopes... once started, how can we quit? I was initially reluctant to get wholly onboard knowing how these projects get bigger and bigger and never really end. On the other hand, no individual project on the house was particularly big or overwhelming.
After the stuccowork we looked at the foundation, or lack thereof, for the other half of the house. Here, the construction was entirely different. Instead of a concrete slab, there was a wood floor built on pier blocks. Cold air freely circulated under the floor, as did the mice that entered there and worked their way up into the walls and ceiling.
We dug a trench around the perimeter to pour a footing and bind the pier blocks together into one mouse-proof and wind-proof unit. This was a slightly bigger project, but still just a couple days labor and a couple hundred dollars.
We poured the footing immediately underneath the walls without worrying about frost-proofing it. The house was small enough and the soil largely consisted of old riverbed rock and gravel anyway, so that frost-heaving wouldn't be an issue. With a trench, form boards, and rebar in place, we called in a cement truck to deliver the concrete. We poured everything along the front directly from the truck, then wheel-barrowed concrete around the backside in rotation with Katie's brother managing a second wheelbarrow.
Afterwards, we added 1 x 4 boards as trim to cover the edges and middle of the plywood sheathing for a more finished look, leaving a gap at the bottom for stonework.
Katie tackled the stonework herself. She wrapped the bottom eighteen inches of the wall with asphalt roofing to protect the woodwork then attached a layer of chicken wire, which was spaced out from the wall with little foam blocks. The chicken wire would serve to tie the masonry work together as she did stonework up the outside.
 A wood-fired water heater and outdoor shower served as interim plumbing. |
Her property was long ago part of the riverbed, so there was an abundance of nice roundish river cobbles to work with. For a beginning stone mason, Katie did a terrific job of mortaring up a nice wall that added elegance to the shack while protecting the base of the wood frame structure from potential water damage.
We were still building without a plan, and we did not yet know where the bathroom would go, as there really wasn't space for it in the existing structure. We needed to add on somewhere, and considered tacking the bathroom on the back of the house where there was presently a pair of French doors.
In the meantime, the kitchen was decided upon, and the window over the future sink was way too small. That was another one-day project. We removed the small window and cut a bigger hole for a 2' x 4' slider I picked up at a secondhand building supply store.
Project-by-project, the shack started looking more and more like a house, though there was still much left to do. Katie had a nice, old-fashioned white gas cookstove that ran on propane. Water from the outside spigot was heated to wash the dishes in a stainless steel sink. Wastewater collected in a five-gallon bucket that needed to be emptied outside each day.
A bucket toilet behind some bushes in the yard served its purpose, with sawdust added between each use. When full, the bucket was emptied into a compost pile away from the house. In the yard we built a wood-fired water heater with a copper coil in a campfire, pressurized by the garden hose to feed an outdoor shower. It worked well for summer, but had to be drained for winter, when she resorted to showers at the laundromat. That sufficed until indoor plumbing became available.
Finally, we figured out the perfect spot for the bathroom. We would pour footings to connect the house with an adjoining slab that was still covered with a tarp shed, in this case, a pipe-frame structure covered with a literal tarp. The bathroom would connect the house and the slab, with a big covered porch over the slab. We removed the tarp shed and poured the footings, another small step forward on the project.
The next time I returned to the jobsite, we framed in the bathroom walls with secondhand 2 x 6's. We cut and peeled a few Douglas fir logs to serve as support poles, cap logs on the walls, and a ridgepole for the porch and bathroom, adding a quasi-timberframe building style to the house.
 Removing a section of wall to make the new doorway to connect the house and bathroom. |
Our friend Kris helped frame in the bathroom and install the rafters, and soon the house was looking pretty promising. Katie hired help to apply sheathing, tar paper, and steel roofing over the new addition.
She found other help to remove the mousey fiberglass insulation, wearing head-to-toe hazmat suits to do the dirty job. I was relieved to miss that part of the work! They did some additional wiring, then hired a contractor to spray in foam insulation. It was a bigger investment for sure, but totally worth it to help transform the shack into a cozy home.
When I finally returned to the project, it was time to cut a door through the stucco wall and close in the bathroom. Some of the wiring had to be rerouted around the new doorway, but otherwise, it was easy to cut through the stucco work with the diamond blade on the Skilsaw.
We finished framing in the triangular walls in the peak of the addition with scrap lumber, then applied oriented strand board (OSB) to the exterior, wired the structure, and wrapped the bathroom in tar paper and stucco wire. We gathered friends and had a one-day stucco party, neatly troweling up the walls over the stucco wire. That worked so much easier than using old chicken wire!
Stucco walls and a steel roof are a particularly good choice in terms of fire prevention. Washington suffered two worst-ever wildfire years in a row, and one of those wildfires burned right up to the property line.
 Electrical wiring for the bathroom/laundry. |
I installed a nice, new bathroom window with trim, glad to largely finish the projects I had started, although there was still much more work to do. Katie hired help to install a big window in the front wall of what became the bedroom, cutting through another section of our original stucco work to put it in place. She hired help with the plumbing and plastering work, but built her own kitchen counters and poured concrete countertops based on plans in my book Living Homes.
Our friend Ronda helped out with mixing mortar for the countertops. She wrote,
The powdered coloring agent is one of the more permanent pigments I have ever encountered. My jeans reminded me of that to this day!
Mixing color in cement needs to be done with care. For even distribution of a dry coloring agent add about half of the dry ingredients for a mixer load, then add all of the color and mix really well, then add the remainder of the dry ingredients, mixing as you go. Then go SLOW AND EASY when adding the water.
Near the end as little as a pint of water can make a big difference. LISTEN to the cement mixer and after a batch or two you will be able to tell how close you are by the sound. Adding more dry ingredients once there is too much water in the mix is extremely problematic and can result in streaks of color and an uneven and brittle texture once it is dry.
On the counter, very near the end of the pour process, we held the butt of a sawzall against the sides of the formwork, held it tight and let it jiggle the mud down into the crevasses beneath the rebar. We previously poked and smooshed the stuff around as best we could with trowels and our hands but this trick vibrated a lot of bubbles out as we went around the outside rim with the sawzall!
As with any cement/stucco work, keeping the tools and shovels rinsed off is important, and it is a GREAT job for kids! A hose and buckets of water on a hot day? Score! And when you are done for the day, wipe the tools down with a little oil.
Don't be shy about the use of what the hardware store won't have. Rubber spatulas in a couple of sizes and a spray bottle of water are good. There is no such thing as too many buckets or too many rags.
Keep track of the formula that you used including the exact brand and name of coloring agent. You may want to add on or do some remodel some day!
For a modest investment paid without a loan, Katie gained a cozy little house that she enjoyed herself and later turned into a rental unit.
The one key problem with the whole project was that neither the house nor the wiring had been inspected nor approved through official channels, which wasn't an issue until she decided to sell the property.
Was it a fully functional, totally safe house? Absolutely. But lacking the official paperwork meant that the structure was classified as an outbuilding, not a house, and therefore the banks would only finance the property as bare land, not as a finished home. Nevertheless, she gained real building skills in the process and adequately recouped her investment in the property to move on to bigger and better dreams.

Interesting Stuff: Check out:
Living Homes: Stone Masonry, Log, and Strawbale Construction.
|


 DirtCheapBuilder.com


