 We moved into a tent on the property and started building our house. |
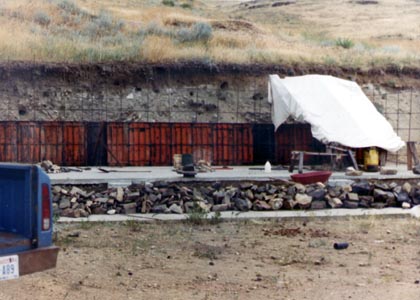 A previous owner excavated a site for a house and poured a concrete slab. We started by pouring a concrete retaining wall on the north and east sides. |
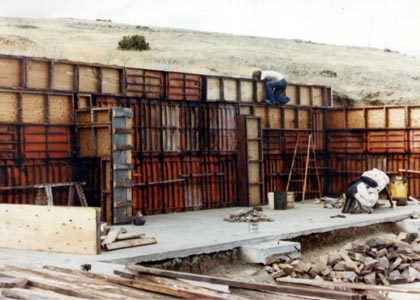 We formed in two concrete buttresses to reinforce the back wall against the future earthload. |
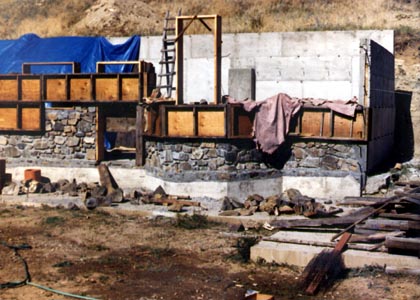 We formed up the other first floor walls with slipform stone masonry. |
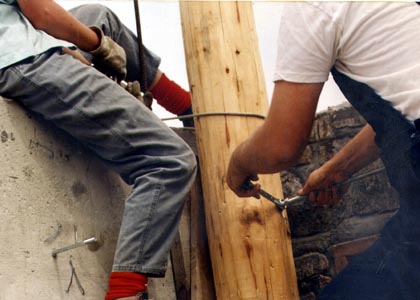 We bolted temporary "lifting poles" upright in each corner of the house. A block and tackle mounted on each pole made it easy to lift logs into place. |
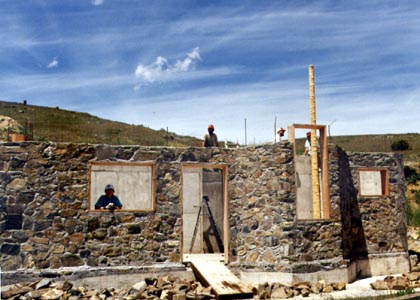 The first lifting pole in place. |
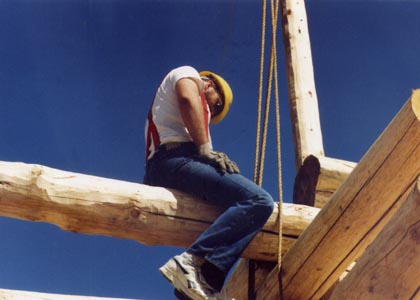 In the butt-and-pass method, logs overlap like brick work at the corner. Rather than notching, the logs are speared together with rebar. |
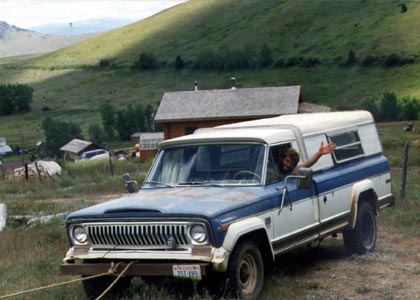 Rather than using muscle to heft the logs up into the air, we simply tied the rope to the truck and drove backwards. |
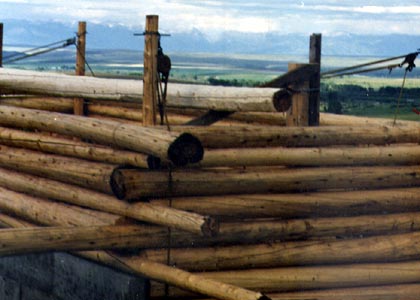 The logs for the upper story are in place. Here we are moving the ridgepole into position. |
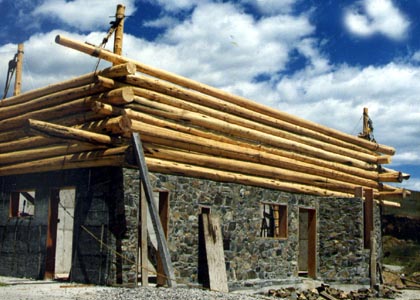 The cap logs extend out past each end of the walls to support the roof. |
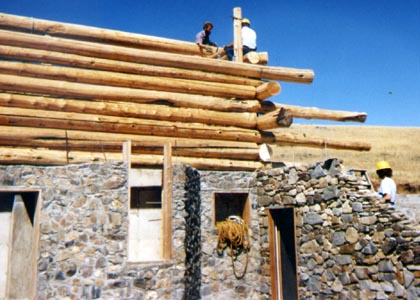 We took a break from the log work to build the cellar, shown here, and later the bathroom, framing in the greenhouse between them. |
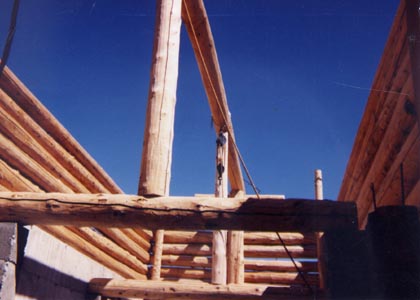 Inside the house, we positioned logs as support for the upstairs floor, then installed ridgepole support logs on top of them. |
 The front of the greenhouse was framed in with logs. Then we framed the roof with rough-cut 2 x 10" rafters. |
 We installed steel roofing over skip sheathing on top of the roof. Insulation will later be added from underneath. |
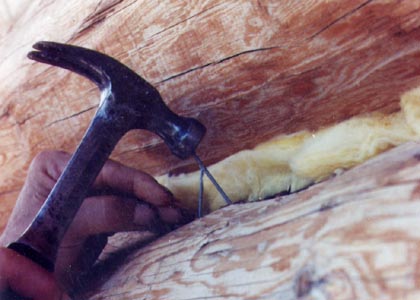 Strips of fiberglass insulation were stuffed in between the logs from both sides. Nails were added to give the chinking mortar something to grab onto. |
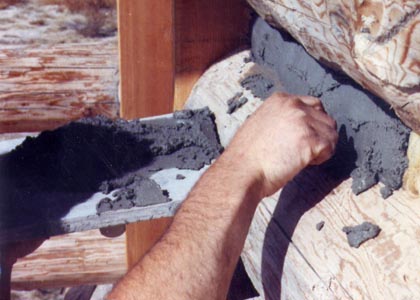 Chinking mortar was troweled in over the fiberglass and nails. |
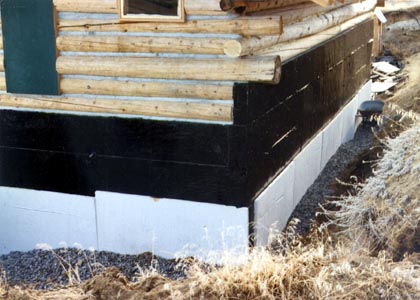 We painted the back walls with tar, added rigid insulation and a drain system, then backfilled around the house with earth. |
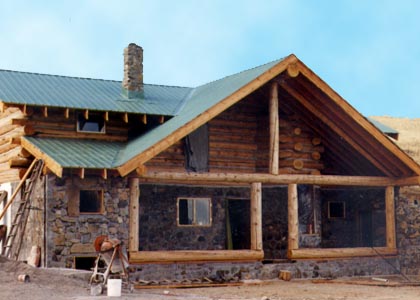 It is starting to look like a house! |
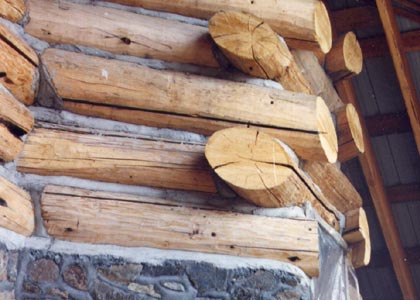 The most challenging part of the log work was cutting and piecing the little logs around the circular stairwell that juts out into the greenhouse. |
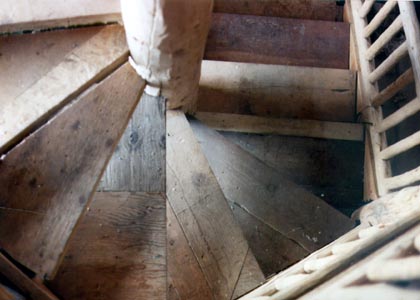 I built the circular stairs entirely out of scrap lumber. |
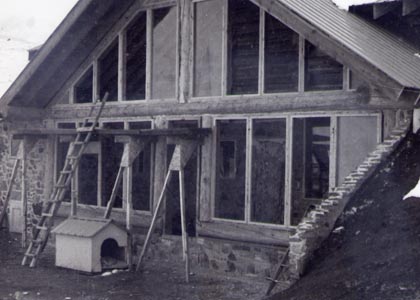 We obtained secondhand patio door blanks for the greenhouse windows for $10 each. |
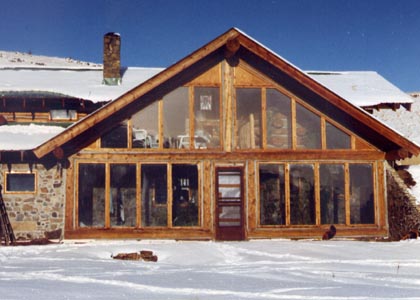 The greenhouse gives us a little bit of summer all winter long. |
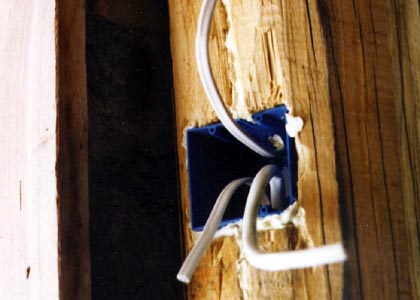 I drilled and chiseled electrical boxes out of the logs. |
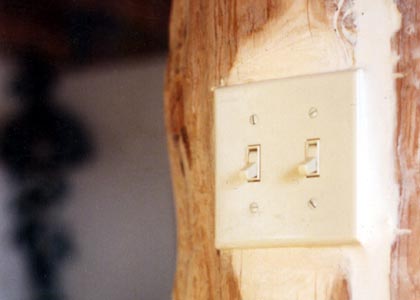 Electrical wires run through natural checks in the logs, which were caulked over to hide them. |
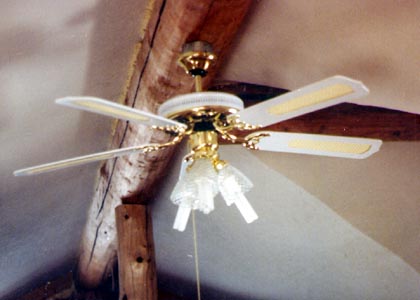 The ceiling fan pushes solar heat from the greehouse into the house. |
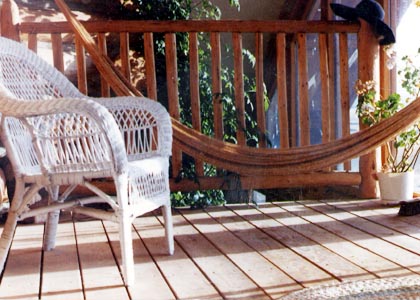 The sunroom is a cozy nook on a sunny winter day. |
 We started the stonework for the addition, then went off and built and sold another stone house before coming back to finish this one. |
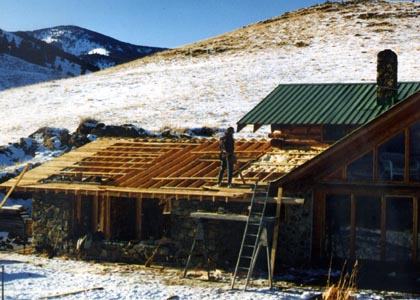 Putting the roof on the addition. |
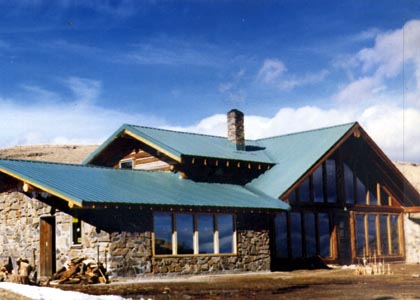 The addition has stone walls but borrows the log-style support system for the roof. |
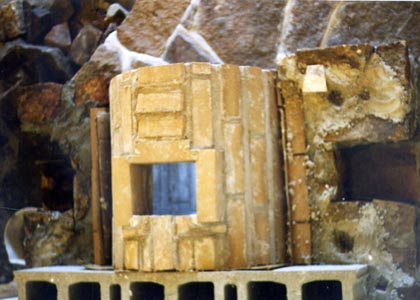 We built a fireplace-style masonry heater (viewed from above) in the familyroom. The cinderblocks behind the fireplace vent heat to protect the wood frame wall behind it. |
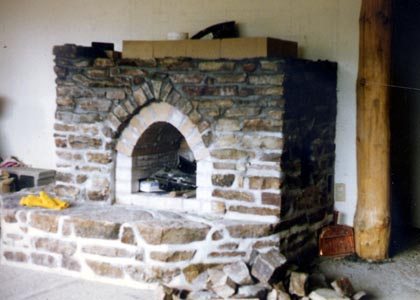 The fireplace has a series of horizontal baffles built above the firebox to extract heat from the exhaust. |
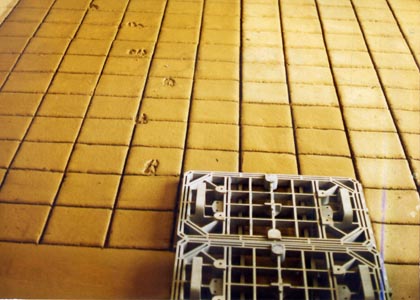 We made our own terra tiles out of sand, cement, dirt, and dye. |
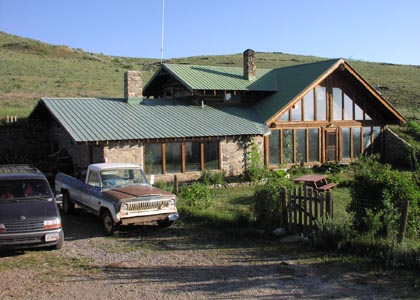 A house becomes a home with some finishing details and a little landscaping. |

Stone and Log
Building a Passive Solar Home on a Shoestring Budget
by Thomas J. Elpel, Author of Living Homes
"The mass of men lead lives of quiet desperation," Henry David Thoreau wrote in his 1854 book, Walden. While most of his contemporaries tried to get ahead in the mid-nineteenth century rat race, Thoreau opted to build a simple cabin by Walden Pond for $28.121/2 where he lived and communed with nature for two years. Having few expenses, he needed employment only about six weeks per year to get by, pursuing his own interests the balance of the time.
I shared Thoreau's philosophy, even before I read his book as a teenager. I didn't want to get trapped in the rat-race and spend my whole life doing meaningless work to pay bills. I wanted to build my own house on a budget, avoid paying mortgage or rent, and have the freedom to live my life. My father died of cancer when I was twelve years old, giving me an acute awareness of the shortness of life and the ceaseless tick-tick-tick of the clock, counting down life's remaining seconds. I don't like to waste them. I value my time more than money. Or more to the point, I value my time more than anything money could buy. I wasn't interested in getting a job to work for money merely to be able to go out and get a burger or go to a movie. When I worked, I wanted it to count for something.
I also understood the value of a "free lunch." Most teenagers look forward to the freedom of graduating from high school, getting their own wheels and an apartment, and being on their own. But to me, the price was too high. I didn't exactly fit in at school, yet I didn't mind it either. I turned my assignments towards my interests and made schoolwork relevant to me. I had few responsibilities, and lots of freedom to hike and camp or go hang out at my grandmother's house on the weekends and all summer long. I recognized what a lot of people have to figure out the hard way - that being in school is easy.
As a young adult, I kept the free lunch going as much as I reasonably could, by living at home or with my grandmother, helping out as needed, avoiding trouble, and living simply. But I also understood that sooner or later I would have to face the music and find a way to support myself.
As a first step towards self-sufficiency, building my own home made sense to me. I reasoned that if I could build a low cost, energy-efficient home, then I could continue the free lunch for the rest of my life, never having to pay rent or a mortgage or a big utility bill. The dream started back in high school, and I read and re-read all the available issues of The Mother Earth News, absorbing ideas and sketching out house plans. Back then, in the 1980s - Mother was effectively the internet of its time, the best available forum to tap into ideas on alternative building, energy efficiency, sustainable building, and low-cost living. I didn't have much in the way of building skills, but I really knew how to dream.
One thing I knew for sure is that I did not want a conventional wood frame house. That was probably related to all of my parents' painting projects during my childhood. My childhood home was big and white and periodically needed a fresh coat of paint, inside and out, and all the way around. So did the big white picket fence that went around the yard.
More than anything, I really liked the look and texture of homes built of stone and other natural materials like log or strawbale. I wanted a real house - a house with soul - rather than a sterile box with hollow walls, white paint, and the utter absence of personality. The house that I dreamed of was considerably more elaborate than Thoreau's little cabin, but Thoreau only stayed at Walden Pond for two years. I needed a house that would serve me for a lifetime and preferably still be good enough for my kids, or whomever might come along afterwards.
With my hyper-awareness of time, it seemed crazy that most people spend a good part of their lives packing things in boxes, moving, setting up house, and getting everything in order, only to move and go through the whole process all over again. Why go through all that trouble to unpack a box or hang a picture on the wall, when you know that - sooner or later - you will have to do it all over again? With the inevitable tick-tick-tick of the clock, the future is intimately bound to the present. I didn't want to waste precious moments of my life packing and moving, packing and moving. I wanted to do it once and do it right.
I'm not sure if my interest in stone masonry was directly connected to my dislike for painting, but those childhood experiences definitely made me aware of the issues of home-maintenance, and I wanted a home that was comparatively maintenance-free.
I have also wondered if my interest in stone masonry is somehow rooted in my father's death. Being hyper-aware of the passage of time and the inevitability of death at the end of the road, there is a certain logic in building something that will endure and last through the ages. Being old enough now to witness the ravages of time on old buildings, it is hard for me to fathom why we don't just build everything out of stone!
My interest in girls followed a similar vein. I knew I needed a partner to share the journey. Finding a mate and building a life together seemed like an inevitable necessity. Dating was an inevitable expense required to obtain that partner. Being too introverted and shy to talk to girls didn't help. In high school, I sat at the lunch table for people who didn't have anyone else to sit with. That's how came to know Renee. Between the lunch table and the art room, we eventually overcame our mutual shyness enough to get to know each other and eventually begin dating. Two years out of high school, we did a 500-mile walk across Montana. We were married the following summer and immediately bought land, moved into a tent, and started building our home. It was almost the perfect marriage. We were high school sweethearts, friends, dreamers, and work partners. We managed to hold it together for the next twenty-one years, until our relationship sadly crumbled, as so many love stories often do.
As for employment, I avoided it as much as humanly possible. I tried tanning hides for a living one winter, and sold them at a black powder rendezvous prior to our marriage. I also spent three months building deck rails on apartment buildings in Seattle with my brother. Finally, I spent a total of eight months working at three different wilderness therapy programs for troubled teens. And that was about it. Being pretty much allergic to getting a job made me extremely frugal in the way I spent money. It wasn't work itself that I minded, so much as meaningless work in the employment of others. If I applied myself towards a job, I wanted it to count towards something more meaningful than a paycheck. I spent eleven months of my life employed working for other people and brought a substantial nest egg into the marriage. Renee worked in wilderness therapy programs considerably longer than I and supported us through the completion of our house.
A Place to Stand
In tribal cultures people generally did not own land or pay a mortgage. A young couple could erect a shelter just about anywhere and call it home. With a community to help construct that shelter, a couple could potentially own a mortgage-free home the same day they were married. What we call "progress" has made life increasingly complex, so that it is now necessary to work hard and save money just to buy a place to stand. And yet, it is so essential. I cannot imagine going through life without a place of my own, always having to pay rent or ask permission to store my living flesh. In our culture, owning a place to stand seems as basic a need as shelter, warmth, and food.
Fortunately, real estate was cheap in Montana in the 1980s. A downturn in the economy led to falling prices and some shockingly good deals. There were, for example, many poorly planned subdivisions out in the middle of nowhere, with five-acre tracts for sale for $2,500. We could have bought several parcels... but we were not exactly inspired by these desolate patches of windblown grass. After driving all over western Montana looking for property, we ended up back where we started, in the town of Pony, where my grandmother lived. Here, we could have bought an older house on an acre of ground with a creek running through the property for $20,000. But we envisioned building our own passive solar stone and log home, and so we chose to start from scratch. For $14,000, we bought a five-acre parcel on the edge of town, which included water rights to a spring on an adjacent property. We paid $6,000 down, and took over payments on the remaining balance, saving some cash to get started on the house.
There were two building sites already started on the property. A previous owner intended to build an earth-sheltered home, and so excavated a building site and poured an immense concrete slab before financial issues forced him into bankruptcy. The next owner liked the view better from the other end of the property and excavated a house site there, but never built anything. We could not afford to be choosy with our limited resources, so we naturally utilized the existing concrete slab. We pitched a wall tent nearby, and had the phone company bring our phone service to the tent. That got some strange looks, but they went along with it anyway.
In retrospect, we were very fortunate to buy a property with the beginnings of a house already started. The excavation and concrete work was extensive and would have been expensive. The footings were a foot deep and three-feet wide, intended to support massive concrete walls and an earth-covered roof. The slab was ninety feet long and varied from 25 to 30 feet wide. The back of the slab was ten feet below grade. We were not planning to build an earth-sheltered home, but we did plan to build ours dug into the hillside, so we could reasonably adapt our plans to fit what was already there. Having something to work from was especially helpful, since we had almost no building experience between us. The first biggest challenge in a building project is to establish a square and level space in a world that is inherently unlevel and unsquare, particularly on the side of a hill. Having that part done already meant that we could move more quickly into building the house itself.
We drove up in the mountains and cut down a tree for a temporary power pole, attached a meter and breaker box, and called the power company to hook up the electricity. We also connected to the water from our spring. The spring itself comes out of an old, collapsed mineshaft. Supposedly, there is a pool of water inside the shaft, with a pipe leading out of the hill. The front was collapsed to protect the water supply. The pipe led to a cistern that had been installed by the same guy that poured the big concrete slab. Our parcel used to be part of a larger parcel, and he had split off both the land and the water right, but never finished the connection. We hired a contractor with a Ditch Witch, like a big, dirt-eating chainsaw, to cut a trench around the hill to our property. We laid in 1,100 feet of black plastic pipe from the cistern to our home site, getting not just spring water, but gravity-fed spring water, which negated the need for a well pump and pressure tank. We also built an outhouse, and then we had all the basic necessities of life taken care of so that we could begin building the house.
Concrete and Stone
We started late that first year, since we didn't even buy the land until July. But with electricity for the tools and water to make concrete, we were finally ready to roll. All we needed was a plan.
A house usually starts with a good set of plans, and we had drawn and redrawn our plans many times before we bought the property. In actuality, the footings and slab were not too far off from what we imagined, although the proportions were different. For our final blueprint, we outlined life-sized walls in place on the concrete slab. I didn't draw the plans shown in my book until after the house was completed.
With a plan to work from, the first step in the building process was to pour the concrete retaining wall along the north and east sides of the house. Although the house had some nice footings, there was no rebar sticking up out of them, so we rented a hammerdrill and drilled down into the footings. We inserted vertical rebar, then wire-tied horizontal rebar to it. Most of the rebar was on the property when we bought it. In fact, there was quite a bit of scrap metal on the land, some of which I hauled into the recycling center for cash, and some of which worked its way into our building project.
We rented concrete forms to pour the big back wall, and intermixed them with wooden slipforms we built from 3/4-inch plywood with salvaged, rough-cut 2x4 frames. In order to properly withstand the future earthload against the wall without it cracking, we built a couple of buttresses into the back wall. These stubby, intersecting walls would help divide the main part of the house into individual rooms. Although we had read a lot about stonework, we were really unprepared for doing a big concrete pour. We got some good advice from the neighbors and fumbled along for a few weeks to pull it all together for the big pour.
One section of the original slab was lower than the rest, leaving the edge of the upper slab and footings hanging exposed. As part of our big pour, we set forms and poured a footing across the front, tying all of that together. Our first concrete pour was seventeen yards and came in three separate trucks. Pouring concrete can be a scary deal. The pressure of liquid rock inside the forms is immense, and poor formwork can lead to a blowout of the forms, spilling concrete everywhere, as I would experience on some of my later projects. Fortunately, all went remarkably well on our first pour! We allowed the concrete to set up for a few days, than stripped the forms off.
With two concrete walls in place, we needed to form up two stonewalls to form a box for the main part of the house. We had left rebar protruding out of the concrete work to connect into the stone walls, so it was just a matter of setting up the slipforms and doing the stonework. We ordered our first ten yards each of sand and gravel, bought some cement, and started mixing concrete in a little cement mixer we had bought at an auction. Although we had read about slipform stone masonry, we hadn't actually done it before, so we learned as we went, which is evident in the changing quality of our stonework throughout the house.
Our slipforms were two-feet tall and eight feet long. We placed the forms on both sides of the wall, then wire-tied them together, using spacers to hold them apart at the right width. The spacers were removed as we filled the forms with stonework, concrete, and rebar. Basically, we put stones inside the forms against the plywood. The reinforcing bar ran through the middle of the wall, and we poured concrete to fill the voids around the stonework. Later we "slipped" the forms up the wall, then chipped away any excess concrete from the front of the completed wall. Afterwards, we carefully troweled a smooth mortar of sand and cement in between the stones to give the wall a finished look.
All of our rocks came out of the local hills, mostly from along the county roads. In more populated areas people might care about such a thing, but here in the Rocky Mountains, there are more rocks than blades of grass, and everybody drives up in the hills gathering rock for their projects. And since our neighbor worked at the local cement plant, we were sometimes able to buy mix-matched bags of cement at a good discount, so that helped keep costs down, too.
These initial stonewalls had no insulation in them. The big wall across the front would divide the house from the greenhouse, so we faced it with stone on both sides, filling the space in the middle of the wall with concrete and rebar. The west wall had stonework on the inside and concrete with wooden furring strips embedded in it on the outside. This is the reverse of how most stonewalls are built, but the outside would later be enclosed as part of a planned addition, and we would build a frame wall there to hide some electrical and plumbing work.
The most unusual part of our work was the stairwell, which never really fit into our house plans. We made the stairwell fit by bumping the stone wall out into a little three-sided bay that protruded into what would later become the greenhouse. That decision added a lot of interest to the design of the house, but also greatly complicated every step of the building process, starting with the stonework. It took significantly longer to set the forms around the stairwell, and then we had to find rocks to properly fit each of the four corners it created. Later, we would have to fit our log walls around the stairwell, too. Since the three-sided bay was half of a hexagon, we referred to the stairwell as the "hex."
We had our first snowstorm in late September and finished our stonework for the year shortly after that. The two concrete walls and two stonewalls enclosed a space forty feet long and about fifteen feet wide, or 600 square feet in area. It wasn't that big, but it was only a small part of the house. We would later add the greenhouse, bathroom, and cellar in front of that, plus a log upper story, and eventually the addition, to bump the house up to 2,300 square feet. During that first winter, we bolted our slipforms together to make a tool shed, took down the tent, and went back to work guiding troubled teens in the wilderness, saving money for the next phase of the building process.
Building Log Walls
We envisioned building the upper story of the house in log, but had very little knowledge about how to proceed. Fortunately, Renee's parents had recently taken a class from Skip Ellsworth through the Log Home Builders Association in Woodenville, Washington. They were pretty excited to try Skip's butt-and-pass log home building technique. This method makes log-home building super simple. There is no notching and no settling of the logs. Instead, a log from one wall extends out past the corner, while the log from the other wall butts into it. The logs are securely pinned together with rebar to hold them in place without notching. The logs overlap on the next level, kind of like brick-laying the corners, but with logs. The length of log extending out past the corner is called the overdangle, and these are trimmed to the desired length after the walls are up. My in-laws practiced on our house. We later helped them build their own 3,000 square foot log home.
We started our log work by ordering a truckload of house-building logs. This was in 1990, and what we got was a load of fire-blackened trees from the fires of 1988. That was the year that much of Yellowstone National Park burned. There were many other fires that year, too, and these logs came from somewhere near Townsend, Montana. The logger demonstrated a special tool for peeling the burned bark off the log. The Log Wizard is a joiner blade that attaches to a chainsaw and is turned by the chain. You walk backwards along the log, peeling off a strip about three inches wide, then turn around at the end, peeling another strip all the way back. It was a pretty impressive tool, but we were on a severely restrained budget and figured we could hack through the job with drawknives. We peeled one strip about five feet long on one log, and decided the Log Wizard was the way to go. I think it is one of the greatest tools ever invented!
After peeling all the logs, we cataloged them according to length, diameter, and straightness, etc. Then we designated four skinny logs as "lifting logs" and bolted one upright in each corner of the house. From the top of each lifting log we hung a block-and-tackle or pulley set, so that we could easily lift each log into place.
The first set of logs is the most challenging, because they have to be measured, drilled, and fit into place over rebar that extends up out of the concrete walls below. To get the measurements, we snapped a chalk line down the center of the wall, then measured the distance to each piece of rebar coming up out of the concrete. We also measured the distance from the chalk line to the center of each piece of rebar. We determined top and bottom for the first layer of logs, then rolled them over and snapped a chalk line on what would become the bottoms. We measured off the chalk line to mark the holes and drilled all the way through the logs. After drilling the holes, we wrapped heavy-duty straps around the logs, hooked up the block and tackle and lifted them into place, carefully lowering them onto the rebar coming up out of the walls. Then we sledgehammered the top of the rebar over flat on top of the logs to secure them to the walls below.
Rather than hoisting everything by hand, we found it easiest to run the ropes out to the vehicles and drive backwards to work the pulleys. Each ropes was directed through a single-wheel "snatch block" at the bottom, so that the rope was pulled straight down from the block-and-tackle, then diverted out to the truck.
The log work was a lot easier after the first layer was up. We raised each new log into place, then hammered in a temporary "log dog," like an oversize staple, to help hold the log steady. Then we moved down the logs in teams. The first person drilled a hole all the way through the first log, but stopped short of the log below. The next person hammered a piece of rebar through the hole with a three-pound sledgehammer, again stopping short of the log below. The third person came along with an eight-pound sledgehammer and drove the rebar pin on through like a big nail, nailing the logs together. Ideally, the rebar pins were long enough to go all the way through one log and halfway into the next. We also drove in horizontal rebar pins at the corner. With the logs thoroughly shish ka babbed together like this, there is no room for settling. A log can shrink into itself, but cannot settle. The rebar pins very nicely secure everything together. Ideally, we removed the log straps while we still could, just before sinking in any rebar pins near the corners. In this way, we managed to raise the entire log upper story of the house in just a few weekends. We planned to cut the doors and windows out later.
But first, we went back to ground level and did some more stone masonry in front of the house, building a bathroom and cellar entirely out of stone, on opposite ends of the house. The space in between would become the greenhouse. Along the way, we also cut into the log walls at the stair well, and bumped the log work out into a three-sided bay to match the stonework below.
The next step in the process, after completing the walls, was to build the support system for the roof. In the Skip Ellsworth system, the weight of the roof does not rest directly on the walls. Instead, the builder starts with two vertical ridgepole support logs, which rise up from the bottom floor. These support logs are bolted to the walls, and then the ridgepole is hoisted up and pinned into place. The bow or crown of the ridgepole is allowed to hang down at first. Then, it is leveled with the aid of a jack and a 2x4 or a 4x4. A central support log is put in place to keep the ridgepole level. For sheer showmanship, the ridgepole is often the biggest log out of the bunch, and the support logs should be sized to match correspondingly. And since the support logs run vertically up through every level of the house, they must be incorporated into the design. Fortunately, we had an ideal space at each end of the house for the support logs. We did not, however, have room in the middle of the house for the essential third support. Instead, we installed two crossbeams that would later support the upstairs floors, and then did a ridgepole support log up from each of these beams. These horizontal beams were short enough to resist bowing from the weight of the roof.
The outer edge of the roof does rest on the walls, and so the last couple of logs we installed (before the ridgepole) were "cap logs," which overdangled on both ends of the house to support the rafters. With the ridgepole and rafters in place, it is pretty easy to frame in the roof. We built ours with rough-cut 2x10s, which we bolted together over the ridgepole like hinges. Each pair of rafters got on bolt to hold them together, making it possible to slide them back and forth or lift up one side independently of the other. We moved them into place, then used a string level across the middle, and later across the cap logs, to carefully level each set of rafters. I used the chainsaw as needed to remove any bumps in the ridgepole, until the rafters set down securely. Then we nailed them all in place. At this point, the rafters still overlapped slightly like an "X" above the ridgepole. I trimmed off the top of the "X," so that the roof came up to a nice point. We also installed "bird blocks" between each set of rafters above the cap logs to hide the future insulation. Finally, we nailed in 1x6 inch, rough-cut "skip sheathing" across the top of the rafters to support the metal roofing. We would put that on first, then come back from inside at a later time to insulate the roof and install plasterboard as a ceiling.
With the roof in place, I went back and cut out and framed in the windows and doors. In this type of log construction, the frames can be nailed directly into the logs, since there is no settling of the walls. That greatly simplifies the process. We also installed 2x10 rough-cut floor joists for the upper level and installed 2x6, tongue-and-groove decking across the joists.
To chink between the logs, we first shoved strips of fiberglass insulation into the joint from each side, then hammered lots and lots of little galvanized nails part way into the logs to give the chinking mortar something to hold onto. We mixed up a mortar of sand, cement, and lime, and troweled it into the joints. It was a little bit like pointing or grouting a stonewall, except a whole lot faster and easier.
Finally, we sealed the concrete retaining wall in the back with tar, added some drainpipes and gravel, insulated the wall, and then hired a backhoe to fill the hole. We moved into the house for that second winter, but with no insulation, doors, windows, or money. We tightened it up as quickly as time, money, and resources allowed, and gradually transitioned into interior details, such as plumbing and wiring.
The Addition or Completion
The "addition" to the house was part of the original plan, so building it was more of a completion of the house than an addition to it. The addition would include the family room, a bedroom, and the laundry room. We started the stonework right away, but then got side-tracked with other projects for awhile, like making a living.
I had this dream of starting a construction company and building stone houses for the masses. I wanted to build hundreds of them. I wanted to see other people build and sell stone houses. We started by building and selling a little, one thousand square foot stone house, which was later featured in an article on slipform stone masonry in The Mother Earth News magazine. It took us a full year to build and finish out all the details on the house. We sold it and came away with a nice fat check, which was probably about right to cover the labor for one person for an entire year, and there were two of us. Naturally, we didn't get around to building and selling any more stone houses, although I often dream about finding the means to mass produce them.
Nevertheless, we did come away with enough cash to a) replace our dying car with another used vehicle, b) print some of my books, and c) finish the addition to the house. We taught our first stone masonry classes and finished the stonework for the addition and put the roof on. There was still a section of the original concrete slab left to build on, but we opted to build a retaining wall around the north and west side and turn the slab into a patio. A couple years later we built a masonry heater or Russian fireplace, with a baffle system to extract heat from the exhaust. Then we tiled the floor in the addition. From start to finish, we spread construction of the house out over nearly ten years, mostly a factor of building the place without money or regular employment. I spent much of that time working on wilderness survival skills and writing.
Of course, a house is never really "done," so we kept building and remodeling after that. We built a small workshop out of stone and eventually added enough solar panels to run the electric meter backwards and zero out our utility bill.
Along the way, we adopted three children and later had a baby. We had the house of our dreams, our family, no mortgage, and only about a $5 per month meter fee from the power company. We had the freedom to do whatever we wanted in life. Unfortunately, that wasn't enough to hold our marriage together. In retrospect, I'm not sure that Renee and I ever really had all that much in common, but I had great dreams and ambitions in life, and she was interested in me. That sold me on the relationship.
I was the one driven by ambition, and Renee helped turn those dreams into reality, but they were my dreams, not hers. As she sometimes said, if it had been up to her, we probably would have ended up living in a modular home. Instead, we were living in what was arguably my town, surrounded my relatives, not hers. She didn't reach out and make friends in town, but drove to Bozeman at least twice a week to be with her own family.
Eventually, my publishing business and online bookstore took over too much space in the house. We looked around at business properties and fell in love with Granny's Country Store in Silver Star - all the way on the other side of the mountains. It would be a crazy commute, but the store had an apartment built into it, so we could live there part time and be at home the rest of the time. Renee had always wanted her own general store, so it seemed like the perfect opportunity to satisfy a dream that was hers, not mine. The store also included the community post office and the responsibilities that come with it. Coincidentally, Renee had often pretended to sort the mail when she was a child, putting letters between the stairway railings of her parents' home. Bringing the business out onto "Main Street" brought two very shy people out into the center of the community... just not the community where our home was.
We home-schooled the kids that first year of running the store. Later, we enrolled them in a nearby school and largely abandoned our dream home in Pony. I came home every week or two to work on my writing, water the greenhouse, mow the yard, and whatever else needed doing. Renee and the kids seldom came with me. We eventually built a similar-sized passive solar stone house next door to the store, originally intended as intern housing for my Green University®, LLC program. However, our marriage ended by the time the house was reasonably complete. Renee naturally moved into that house and I kept our original home in Pony. I had never really left it anyway. I always kept my clothes in a duffel bag while migrating back and forth between our two towns. I never put them in a dresser in Silver Star because it was never my home.
Our story would have been much better if it had a live-happily-ever-after-ending, but sometimes reality gets in the way of one's dreams. We were fortunate, however, in that we had two homes, two businesses, and two cars before our marriage crumbled. Experiencing the end of our marriage was traumatic enough in itself. It gave a different meaning to Thoreau's words, that "The mass of men lead lives of quiet desperation." I don't know how other people endure the loss of separation and divorce without the security of already owning a separate home and a safe place to stand when the walls of one's life come crumbling down. The separation was far easier than it would have been otherwise, and I am thankful in that we both have the security of owning our respective homes. Out of the ashes of the past, I am thankful for the freedom to re-imagine my dreams and start my life anew.

Check out Living Homes: Stone Masonry, Log, and Strawbale Construction.
|


 DirtCheapBuilder.com


